NIO
非阻塞 IO
本笔记资料 来自黑马程序 Netty 教程 及 自己的一些总结
ByteBuffer
在内存开辟一个缓冲区,大小不宜过大
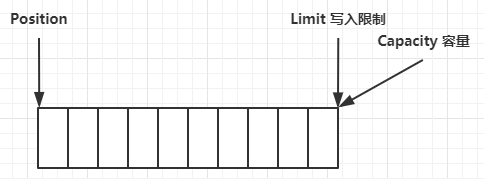
ByteBuffer 的分配和状态
1
2
| FileChannel channel = file.getChannel();
ByteBuffer buffer = ByteBuffer.allocate(10);
|
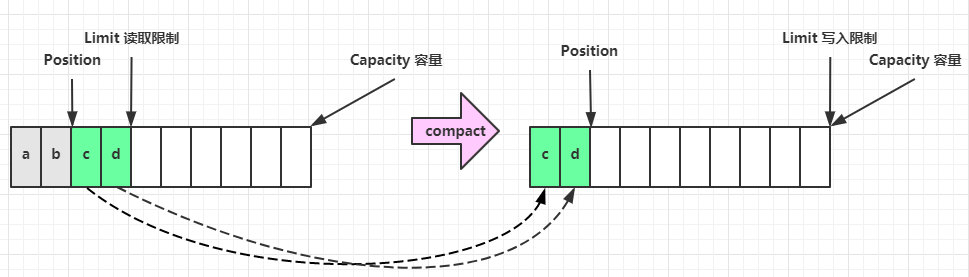
一开始 的 状态是写模式 也就是分配完空间后
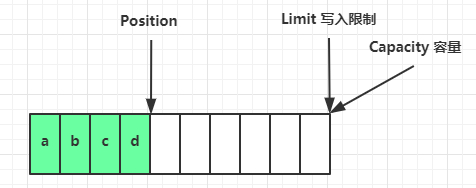
写模式下,position 是写入位置,limit 等于容量,下图表示写入了 4 个字节后的状态
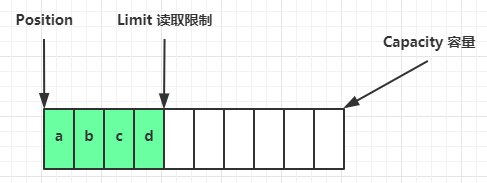
flip 动作发生后,position 切换为读取位置,limit 切换为读取限制
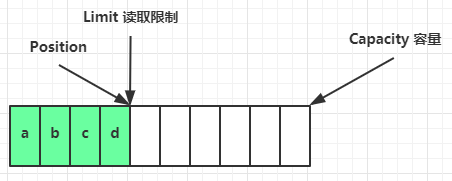
读取 4 个字节后,状态
clear 动作发生后,状态又变回写,注意这里面内容也清空,所以一般读取完才调用
compact 方法,是把未读完的部分向前压缩,然后切换至写模式
不同类型的空间分配
1
2
| ByteBuffer buf1 = ByteBuffer.allocate(16);
ByteBuffer buf2 = ByteBuffer.allocateDirect(16);
|
ByteBuffer 常见方法
写数据
1
2
3
| int readBytes = channel.read(buf);
buf.put((byte)127);
buf.put(byte[]);
|
读数据
1
2
3
| int writeBytes = channel.write(buf);
byte b = buf.get();
buf.get(int i)
|
调指针
1
2
3
4
5
6
| buf.rewind();
buf.mark();
buf.reset();
buf.limit();
buf.limit(16);
|
字节数组到 ByteBuffer 转换
1
2
3
4
5
6
7
8
9
|
ByteBuffer buffer1 = StandardCharsets.UTF_8.encode("你好");
ByteBuffer buffer2 = Charset.forName("utf-8").encode("你好");
ByteBuffer buffer = ByteBuffer.wrap("hello".getBytes());
CharBuffer buffer3 = StandardCharsets.UTF_8.decode(buffer1);
System.out.println(buffer3.toString());
|
⚠️ FileChannel 工作模式
FileChannel 和传统的文件 I/O(例如 FileInputStream、FileOutputStream)之间有几个重要的区别:
非阻塞 I/O:
FileChannel 支持非阻塞 I/O 操作,这意味着你可以使用 FileChannel 的某些方法进行异步 I/O 操作,而不必等待每个操作完成。
传统的文件 I/O 是阻塞的,即在进行读或写操作时,程序会一直等待直到操作完成。
ByteBuffer 使用:
FileChannel 与 ByteBuffer 配合使用,通过将数据存储在 ByteBuffer 中来进行读写操作。
传统的文件 I/O 使用 InputStream 和 OutputStream,并且通常需要在读取或写入数据之前创建一个字节数组。
文件锁定:
FileChannel 具有支持文件锁定的能力,可以通过 FileLock 对象实现对文件的独占或共享锁定。
传统文件 I/O 通常不提供直接的文件锁定机制。
内存映射:
FileChannel 允许将文件的一部分或整个文件映射到内存中,以便直接在内存中进行读写操作,提高性能。
传统文件 I/O 没有内存映射的直接支持。
性能优势:
由于 FileChannel 允许进行一些底层的优化,因此在某些情况下,它可以提供更好的性能,特别是对于大量数据的读写操作。
传统文件 I/O 可能会在处理大量数据时变得相对较慢。
FileChannel 只能工作在阻塞模式下
获取
不能直接打开 FileChannel,必须通过 FileInputStream、FileOutputStream 或者 RandomAccessFile 来获取 FileChannel,它们都有 getChannel 方法
- 通过 FileInputStream 获取的 channel 只能读
- 通过 FileOutputStream 获取的 channel 只能写
- 通过 RandomAccessFile 是否能读写根据构造 RandomAccessFile 时的读写模式决定,指定 rw
读取
会从 channel 读取数据填充 ByteBuffer,返回值表示读到了多少字节,-1 表示到达了文件的末尾
1
| int readBytes = channel.read(buffer);
|
写入
写入的正确姿势如下, SocketChannel
1
2
3
4
5
6
7
| ByteBuffer buffer = ...;
buffer.put(...);
buffer.flip();
while(buffer.hasRemaining()) {
channel.write(buffer);
}
|
在 while 中调用 channel.write 是因为 write 方法并不能保证一次将 buffer 中的内容全部写入 channel
关闭
channel 必须关闭,不过调用了 FileInputStream、FileOutputStream 或者 RandomAccessFile 的 close 方法会间接地调用 channel 的 close 方法
位置
获取当前位置
1
| long pos = channel.position();
|
设置当前位置
1
2
| long newPos = ...;
channel.position(newPos);
|
设置当前位置时,如果设置为文件的末尾
- 这时读取会返回 -1
- 这时写入,会追加内容,但要注意如果 position 超过了文件末尾,再写入时在新内容和原末尾之间会有空洞(00)
大小
使用 size 方法获取文件的大小
强制写入 ✨✨
操作系统出于性能的考虑,会将数据缓存,不是立刻写入磁盘。可以调用 force(true) 方法将文件内容和元数据(文件的权限等信息)立刻写入磁盘
两个 channel 传递数据
1
2
3
4
5
6
7
8
9
10
11
12
| String FROM = "helloword/data.txt";
String TO = "helloword/to.txt";
long start = System.nanoTime();
try (FileChannel from = new FileInputStream(FROM).getChannel();
FileChannel to = new FileOutputStream(TO).getChannel();
) {
from.transferTo(0, from.size(), to);
} catch (IOException e) {
e.printStackTrace();
}
long end = System.nanoTime();
System.out.println("transferTo 用时:" + (end - start) / 1000_000.0);
|
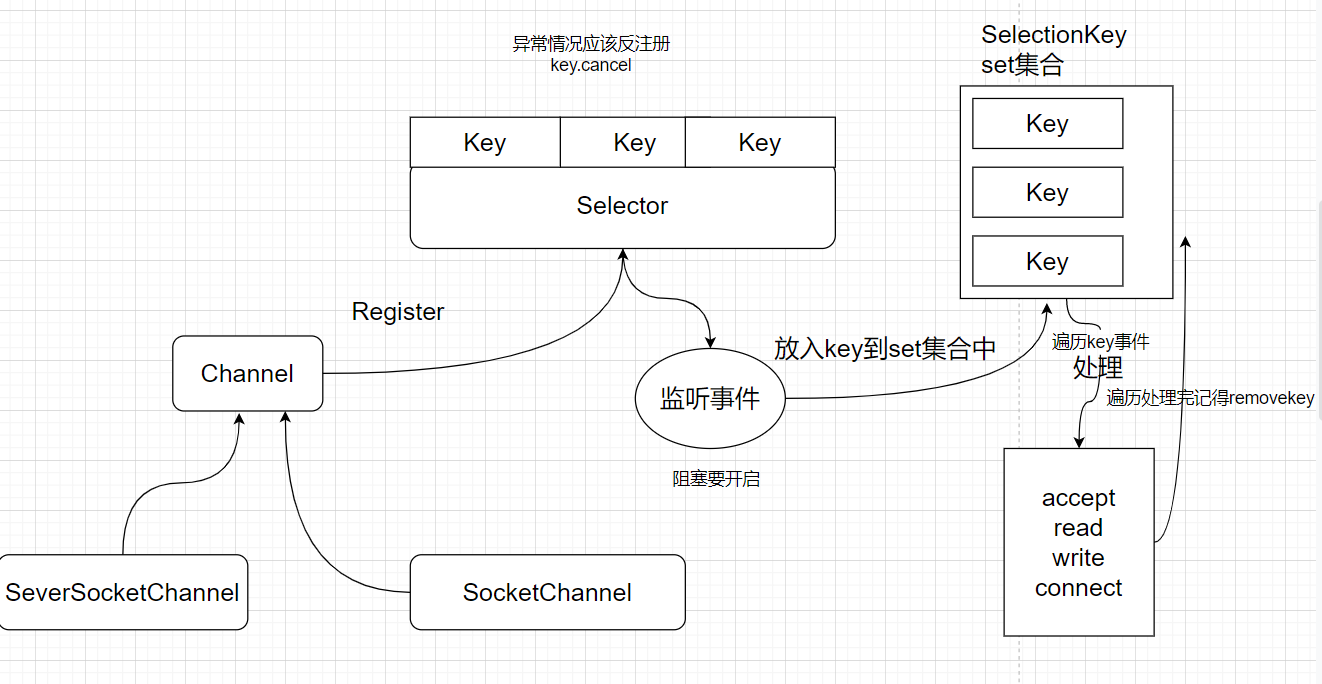
Selector 管理 Channel
1
2
3
4
5
6
7
8
9
10
11
12
13
14
15
16
17
18
19
20
21
22
23
24
25
26
27
28
29
30
31
32
33
34
35
36
37
38
39
40
41
42
43
44
45
46
47
48
49
50
51
52
53
54
55
56
57
58
59
60
61
62
63
64
65
66
67
68
69
|
Selector selector = Selector.open();
ByteBuffer buff = ByteBuffer.allocate(16);
ServerSocketChannel ssc = ServerSocketChannel.open();
ssc.configureBlocking(false);
SelectionKey sscKey = ssc.register(selector, 0, null);
sscKey.interestOps(SelectionKey.OP_ACCEPT);
ssc.bind(new InetSocketAddress(8888));
while (true) {
selector.select();
Iterator<SelectionKey> iterator = selector.selectedKeys().iterator();
while(iterator.hasNext()){
SelectionKey key = iterator.next();
iterator.remove();
log.debug("key {}",key);
if(key.isAcceptable()) {
ServerSocketChannel channel = (ServerSocketChannel) key.channel();
SocketChannel sc = channel.accept();
sc.configureBlocking(false);
SelectionKey sk = sc.register(selector, 0, null);
sk.interestOps(SelectionKey.OP_READ);
} else if (key.isReadable()) {
try {
SocketChannel channel = (SocketChannel) key.channel();
int read = channel.read(buff);
if(read==-1) key.cancel();
else {
buff.flip(); ByteBufferUtil.debugRead(buff);
buff.clear();
}
} catch (IOException e) {
key.cancel();
throw new RuntimeException(e);
}
}
}
|